Ugly Hole Fixed, Car Flipped, More Nasty Rust (16 - 17 November 2002)
An eventful weekend, this was — though not because too many things got done. It was mainly because things changed visually so much. Now when you enter the
 garage (a.k.a. "The Cat Cage"), you see the bottom of the car, not the top. Of course, this opens up many new possibilities, since the ugly old
floors are very visible; and, more importantly, they are supremely accessible. The sills on the sides of the car are also very accessible and quite easy to work
on.
garage (a.k.a. "The Cat Cage"), you see the bottom of the car, not the top. Of course, this opens up many new possibilities, since the ugly old
floors are very visible; and, more importantly, they are supremely accessible. The sills on the sides of the car are also very accessible and quite easy to work
on.
Ugly Hole Fixed (16 November 2002)
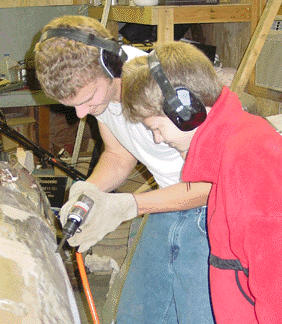
But before the boys and I flipped the car, I finally got the ugly loudspeaker hole welded shut with sheet metal and smoothed with Bondo. I had decided to place a sheet of
 20-gauge metal over the hole and weld along the perimeter. This looked to me fairly straightforward, but the actual doing of it was a bit more complicated. The top
two-thirds of the sheet welded tightly to the body panel, but the bottom portion did not. At the bottom edge, the metal was sticking out about 2 centimeters —
a significant bulge to finesse with Bondo. I actually thought about just leaving well enough alone and using Bondo to cover the lower portion, and yet that seemed a
bit sloppy. I ended up cutting off the portion of the metal that wasn't tight and fashioning a plate to refit into the hole. I ground off the messy weld-metal, and refit
the portion. It fit nicely. I then welded the two pieces together along the seam, and then ground off the excess weld. Bondo flattened it up well enough. Since the hole was
inset the thickness of the sheet metal inside the trunk area, I sanded and cleaned up the area around the hole and bondoed the indent so that it is flat. Of course, the fix lacks two of the creases that are normally
found on this body panel, but this fix was good enough. It is strong, and since it is covered by upholstery, it will also be invisible.
20-gauge metal over the hole and weld along the perimeter. This looked to me fairly straightforward, but the actual doing of it was a bit more complicated. The top
two-thirds of the sheet welded tightly to the body panel, but the bottom portion did not. At the bottom edge, the metal was sticking out about 2 centimeters —
a significant bulge to finesse with Bondo. I actually thought about just leaving well enough alone and using Bondo to cover the lower portion, and yet that seemed a
bit sloppy. I ended up cutting off the portion of the metal that wasn't tight and fashioning a plate to refit into the hole. I ground off the messy weld-metal, and refit
the portion. It fit nicely. I then welded the two pieces together along the seam, and then ground off the excess weld. Bondo flattened it up well enough. Since the hole was
inset the thickness of the sheet metal inside the trunk area, I sanded and cleaned up the area around the hole and bondoed the indent so that it is flat. Of course, the fix lacks two of the creases that are normally
found on this body panel, but this fix was good enough. It is strong, and since it is covered by upholstery, it will also be invisible.
Car Flipped (17 November 2002)
Actually flipping the car over was quite easy. I used the same kind of body supports as I had before, except that I added some styrofoam shapes and padding to make
sure that the more-or-less ready top part of the body shell was not damaged by the supports. We did have to be careful about the "A" posts that form the side edges of the
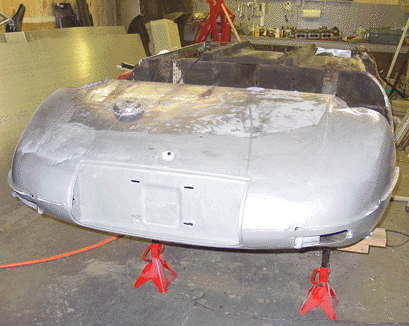 windshield. These could not bear the weight of the body, and we made sure that they never touched the floor as we lifted and turned the body over. This was
mainly a matter of placing the rear (the so-called "boot") of the body on a pad on the floor, then removing the support from the front. Once the entire body rested on the
floor we literally rolled the body onto its side. Then after having placed the support for the front where it could accept the body and support it, we lifted the front part
of the body up, leaning a portion of the body weight onto the rear section. We settled the front onto the frame support, lifted the rear section and put the supports for
the rear into place.
windshield. These could not bear the weight of the body, and we made sure that they never touched the floor as we lifted and turned the body over. This was
mainly a matter of placing the rear (the so-called "boot") of the body on a pad on the floor, then removing the support from the front. Once the entire body rested on the
floor we literally rolled the body onto its side. Then after having placed the support for the front where it could accept the body and support it, we lifted the front part
of the body up, leaning a portion of the body weight onto the rear section. We settled the front onto the frame support, lifted the rear section and put the supports for
the rear into place.
The process wasn't particularly difficult, with the exception of worrying about keeping the "A" posts off the ground. It did take the strength of the three of us and a
bit of organization.
With the car upside down, removing the rusted floor panels is greatly simplified. I got the right side floor panel nearly completely off on Sunday evening, and I managed to
clean up much of the tab where the new floor will attach. I discovered a few places where replacement sheet metal will be desirable, and, for the most part, not too
difficult to install. One of the last sections I removed was the bottom of the "tranny tunnel" — the hump in the center of the vehicle that covers the drive shaft (or,
as the Brits call it, the "propeller shaft").
More Nasty Rust
I hadn't expected to find anything particularly remarkable inside the tranny tunnel, since from the top it appeared to have been spared any ravages of corrosion. As a matter
of fact I had figured that the piece had been replaced at some time, since it seemed pretty much untouched.
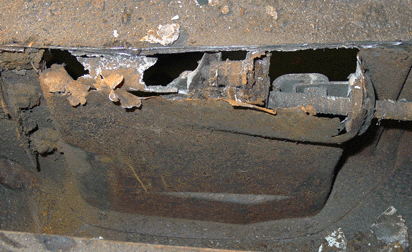 I was wrong, it turned out, since the bottom of the tranny tunnel hadn't been well enough protected from moisture. The tunnel has a bit of an indentation on the driver's
side, where the emergency brake lever is situated. This piece contains the hinge for the lever, an electrical switch sensor that lights up the emergency brake light, and
the cable housing leading to the rear brakes that are engaged by the emergency brake. (Incidently, the E-Type has a separate set of brake pads that are engaged by the
emergency brake.) The bottom of the housing for the brake mechanicals and switch was completely absent — eaten away by moisture seeping and spraying from the road,
presumably.
I was wrong, it turned out, since the bottom of the tranny tunnel hadn't been well enough protected from moisture. The tunnel has a bit of an indentation on the driver's
side, where the emergency brake lever is situated. This piece contains the hinge for the lever, an electrical switch sensor that lights up the emergency brake light, and
the cable housing leading to the rear brakes that are engaged by the emergency brake. (Incidently, the E-Type has a separate set of brake pads that are engaged by the
emergency brake.) The bottom of the housing for the brake mechanicals and switch was completely absent — eaten away by moisture seeping and spraying from the road,
presumably.
Anyway, since I can't fabricate the entire complicated part, I'll have to replace the entire tranny tunnel. That will delay the installation of the floor panels, and I'll
have to put my mind to firming up the mid section of the body shell, since the engine covering and tranny tunnel do give the mid section some rigidity.